Mulder is just an instance of scully whose goal is to promote the idea that it is easy to build your own markup languages to facilitate the editing of site content. This offers the benefit of being able to directly use platforms like Github or gitlab as headless CMS while offering the ability to edit this content with rich editors thanks to the support of the Language Servcer Protocol (LSP) in Web editors like monaco. So the first step to understanding Mulder is to understand Scully.
Scully
Higly inspired from https://blog.bitsrc.io/scully-the-first-static-site-generator-for-angular-1600ead0b8e1
What is Scully?
Scully is a Static Site Generator built on Angular, first released in 2019. An important fact is that Scully uses Chromium, and your OS needs to allow its installation and execution. The best thing about Scully is you’re just coding with Angular. There is no need for rearchitecting or modifying your application. More than a simple Static Site Generator, Scully is a Jamstack toolchain for Angular development. Scully can be easily integrated with an existing Angular project using a simple command. If you want to use Markdown files and use pre-rendering for your applications, you can make it all possible with Scully.
How Does It Work?
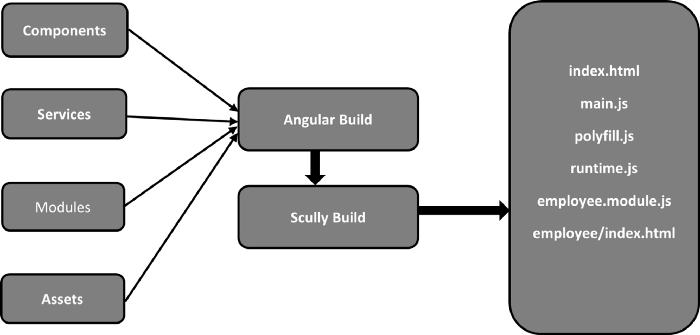
Scully explores the route structure of your Angular application and uses that to create a list of routes. Then it generates a index.html for each route, pre-rendering each page in your app to plain HTML & CSS, and creates a static version of it. If you have 1000 routes in your application, it will create 1000 html files.
Once your application is pre-rendered, it will appear on the user’s view; they will not have to wait until all the JavaScript files are loaded to keep engaging with the website.
Why choosing Scully?
While Angular kept lacking a Static Site Generator, other popular frameworks and libraries like Vue.js and React were rich with SSGs for years. As a result, currently, they are at the top. So, it wouldn’t be entirely fair to compare Scully with them. Still, Scully has some exciting set of features that make it unique among other Static Site Generators.
Speed
The most beneficial reason you should be using Scully is that it helps you to establish an excellent user experience.
Nothing will make your Angular project as fast as using Scully and embracing Jamstack. — Aaron Frost
Scully avoids lengthy loading times to load large JavaScript files by pre-rendering the code to a static format. Because there aren’t any client-side scripts to run, the user would be able to view, and the application becomes more responsive.
Also, Scully helps to reduce the normal Angular application size by 10–15 times.
Plugin System
Plugins play a major role in static site generators. Scully also has a flexible and extensible plugin system to incorporate route plugins and data transform plugins. (We will come back on this point when discussing about DSL)
This way, you will make your custom functionalities inside Scully or go for different plugins made by the community or built-in plugins to help you do things. There are five major types of plugins that let the injection of code into different phases of the Scully Process lifecycle:
- routerplugins: tell Scully how to grab the data needed from the route-params to be pre-rendered pages.
- render plugins: to convert the rendered HTML.
- fileHandler plugins: the contentFolder plugin uses them through the rendering phase.
- routeDiscoveryDone plugins: called immediately after all routes have been collected and all router plugins have been completed.
- allDone plugins are like routeDiscoveryDone plugins, even if they are called after all procedures are performed by Scully.
Centralized Configuration File
You will have access to a config file in each Scully project, and it allows you to manage the whole application from a single place.
export interface ScullyConfig {
  projectRoot: string;
  homeFolder: string;
  outDir?: string;
  distFolder?: string;
  routes: RouteConfig;
  extraRoutes?: string[];
  appPort: number;
  hostName?: string;
  hostUrl?: string;
}
The above example shows a subset of configuration features, and you can easily manage settings like routes, ports, proxy, host URLs, etc.
For example, for mulder, the config file is the following.
import { ScullyConfig, setPluginConfig } from "@scullyio/scully";
import "prismjs/components/prism-java.js";
import "prismjs/components/prism-visual-basic.js";
import "prismjs/components/prism-yaml.js";
import { getTocPlugin, TocConfig } from "scully-plugin-toc";

setPluginConfig("md", { enableSyntaxHighlighting: true });

const tocOptions: TocConfig = {
    blogAreaSelector: "#blog-content", // where to search for TOC headings
    insertSelector: "#toc", // where to insert the TOC
    level: ["h1", "h2", "h3"], // what heading levels to include
    trailingSlash: true, // add trailing slash before the anker ('#')
    scrollIntoViewOnClick: true, // add event to each link that scrolls into view on click:
};
const TocPlugin = getTocPlugin();
setPluginConfig(TocPlugin, tocOptions);

export const config: ScullyConfig = {
    projectRoot: "./src",
    projectName: "mulder",
    outDir: "./dist/static",
    routes: {
        // tslint:disable-next-line:prettier
        '/s/:slug': {
            type: "contentFolder",
            postRenderers: ["toc"],
            slug: {
                folder: "./content/static",
            },
        },
        "/blog/:slug": {
            type: "contentFolder",
            postRenderers: ["toc"],
            slug: {
                folder: "./content/blog",
            },
        },
    },
};
Powerful CLI
Scully’s CLI is powerful to make both Angular and Angular-hybrid projects feasible. This CLI also comes with some command-line options which help you to reduce the development time:
- --baseFilter options allow you to point out specific routes that you need to render and this can save a lot of time since there is no need to pre-render the whole application. (npx scully --baseFilter /route )
- --configFile/--cf allows using different config files.
- --stats saves the latest build statics to a JSON file named scullyStats.json and it will include details like numberOfRoutes, generatingTime, routesPerSecond, etc.
Third-party Integrations
It is possible to generate a Scully site through Github actions. You can build and deploy your Scully site to GitHub Pages using the Github Action Scully Publish. It will allow your users to explore your content in one of the speediest possible ways.
After all, It’s just Angular
As I mentioned earlier, Angular developers have long been waiting for this, and now they have it. They can create blogs just using Angular. Despite Scully being significantly younger than SSG giants like Gatsby and Nuxt.js, it already offers significant features like custom plugins, API integration, 3rd-party scripts, etc. So if you are an Angular lover, I don’t see a reason not to use Scully.
Mulder project structure
In the current version of Mulder we have developed a simple modular application built from 7 modules inspired by the "Clean Blog HTML theme".
- error: components for managing error page
- icons: class for fontawesome icons
- navigation: components and guard for managing the navigation within the site
- surveyplugin: components and parser for the survey DSL (markup language for surveyJS)
- agendaplugin: components and parser for the agenda DSL
- mulder : Core module that contains some components for this website
- app.module: Composite module for assembling all the modules

In these modules, there are the following components.
- About component: About page of the web site (Simple angular component) (presented here)
- Home component: Home page of the web site (Simple angular component) (could be compared to the about page)
- Publications component: Publications page of the web site (example of complex angular component (reuse of D3 cloud component, dynamycally consume hal service API) (presented here)
- Blogs component: blog index pages (Use Scully to create the structure of the page)
- Blog component: blog post page (Use Scully to create the structure of the page)
- Static component: static page rendering (Use Scully to statically consume md file and generate html page)
- DynamicMarkdown component: use to fetch markdown online and automatically render page when loading the page
- SurveyMarkup component: First example of the use of a DSL as a markup language
- AgendaDSL component: First example of the use of a DSL as a markup language
Blogs, blog and static component
Scully offers a plugin for editing blog posts written in markdown format. In practical terms, this plugin offers the possibility to convert markdown content with metadata to an html page within our site. Mulder uses this plugin for two types of routes as shown in the scully configuration file.
It is possible to put markdown content in the PROJECTROOT/content/static/ folder for page renderings like this one or in the PROJECTROOT/content/blog/ folder for new blog entries. From this, we created three Angular components:
- BlogComponent and SaticComponent whose code looks very similar, the purpose of these components is to retrieve the path corresponding to the query to display the html code of the markdown layout correctly.
- BlogsComponent to list all the blog posts.
The BlogComponent and SaticComponent code is rather simple (see below). The behavioural part of the component uses the ScullyRoutesService of the standard scully library to retrieve the meta-data entered in the header of the markdown file, this allows for example to retrieve the title of the page, the subtitle, its description but also the image of the banner to display. The html template of the component takes the classic structure of mulder pages by adding the custom tag scully-content allowing the scully plugin to replace this part of the page by the html code resulting from the transformation of the markdown file by the marked library.
import { Component, OnInit } from "@angular/core";
import { ScullyRoutesService } from "@scullyio/ng-lib";
@Component({
    selector: "mulder-blog",
    templateUrl: "./blog.component.html",
    styleUrls: ["./blog.component.scss"],
})
export class BlogComponent implements OnInit {
    post!: any;
    defaultBackground = 'url("assets/img/home-bg.jpg")';

    constructor(private scully: ScullyRoutesService) {}

    ngOnInit(): void {
        this.scully.getCurrent().subscribe((e) => {
            this.post = e;
            if (e?.route?.startsWith("/blog")) {
                this.defaultBackground = 'url("assets/img/blog-bg.jpg")';
            }
        });
    }
}<mulder-layout *ngIf="post">
<mulder-main-header [backgroundImage]="post?.backgroundImage || defaultBackground"
[heading]="post?.title" [subHeading]="post?.subTitle" [meta]="post?.meta?.join(', ')">
</mulder-main-header>
<article>
<div class="container">
<div class="row">
<div id="blog-content" class="col-lg-12 col-md-12 mx-auto">
<scully-content></scully-content>
</div>
</div>
</div>
</article>
</mulder-layout>This BlogsComponent component selects all scully routes that start with the path corresponding to blog entries. It then retrieves the metadata of each blog entry and formats it. The html template of the component follows the classic structure of mulder pages. The BlogsComponent code is the following.
import { Component, OnInit } from "@angular/core";
import { Router } from "@angular/router";
import { ScullyRoute, ScullyRoutesService } from "@scullyio/ng-lib";

@Component({
    selector: "mulder-blogs",
    templateUrl: "./blogs.component.html",
    styleUrls: ["./blogs.component.scss"],
})
export class BlogsComponent implements OnInit {
    constructor(private router: Router, private scully: ScullyRoutesService) {}

    title!: string;
    blogPosts!: ScullyRoute[];

    bakgroundImg = 'url("assets/img/home-bg.jpg")';

    ngOnInit(): void {
        this.title = this.router.url.replace("/", "");
        this.title = this.title.charAt(0).toUpperCase() + this.title.slice(1);
        if (this.title === "Blog") {
            this.bakgroundImg = 'url("assets/img/blog-bg.jpg")';
        }
        this.scully.available$.subscribe((routes: ScullyRoute[]) => {
            this.blogPosts = routes.filter(
                (route: ScullyRoute) =>
                    route.route.startsWith(this.router.url) &&
                    route.sourceFile?.endsWith(".md")
            );
        });
    }
}
<mulder-layout>
    <mulder-main-header [backgroundImage]="bakgroundImg" [heading]="title"  [siteHeading]="true">
    </mulder-main-header>
    <ng-container *ngIf="blogPosts"
        ><div class="container">
            <div class="row">
                <div class="col-lg-12 col-md-12 mx-auto">
                    <div class="post-preview" *ngFor="let post of blogPosts | sortBy:'desc'">
                        <a [routerLink]="post.route">
                            <h2 class="post-title">{{post?.title}}</h2>
                            <h3 class="post-subtitle">{{post?.description}}</h3>
                        </a>
                        <p class="post-meta">{{post?.categories?.join(', ')}}</p>
                    </div>
                </div>
            </div>
        </div>
    </ng-container>
</mulder-layout>
Among the cool feature provided by Scully, Scully offers a command line tool to create new blog posts (i.e. new markdown files).
At the top of that Markdown file there is some information in YAML, this is the Front Matter. This won’t show up in the blog post but we can use it to store information about the blog post. We can also use this metadata in a lot of ways but we’ll talk about that when we make our page of all the blog posts.
You can for example add the following metadata and reuse this metadata to change the layout, change the banner image, ...:
---
layout: blog-post
title: Add wifi to any camera
place: Rennes, France
categories: [OpenWRT,Camera,Canon]
published: true
---
To get some content into our blog we can generate a post using yet another generate command. This command will call on Scully’s post generation code and we can pass a name in as well.
ng g @scullyio/init:post --name="The First Post in Mulder"The CLI will prompt “What’s the target folder for this post?” We’ll go with the default “blog” directory. In the future we can make specific folders for posts, even nested folders.
It exists also some plugins that automatically add some metadata for your blog posts (e.g. ⌚ scully-plugin-time-to-read 📖 Plugin). Of course you can easily create your own.
Navbar menu configuration
A final part that is made configurable in Mulder is the menu bar. This one consumes a json file (src/dynamicRoutes.json see an excerpt of this file below). This file configures the different entries of the menu on two levels and the different associated path. It is also possible to add other meta-data that can be consumed later. These data are consumed statically by the nav-bar component hosted the navigation module
[

    {
        "path": "",
        "menupath": "home",
        "orderpath" : 1
    },
    {
        "path": "s/motivations",
        "menupath": "Motivations",
        "orderpath" : 2

    },
    {
        "path": "s/webcomponent",
        "menupath": "component/Undertanding the notion of Web component",
        "orderpath" : 3
    },
    {
        "path": "s/mulderstructure",
        "menupath": "component/Undertanding the mulder page structure"
    },
    {
        "path": "s/componentabout",
        "menupath": "component/Learning through example: a simple component"
    },
    {
        "path": "about",
        "menupath": "component/A simple angular component: About page"
    },
    {
        "path": "s/componentpublications",
        "menupath": "component/Learning through example: a more complex component"
    },
    {
        "path": "publications",
        "menupath": "component/A more complex angular component: Publications pages"
    },
    {
        "path": "s/componentrouting",
        "menupath": "component/Understanding routing"
    },
    {
        "path": "foo",
        "menupath": "component/Routing to an error page"
    },
    {
        "path": "s/scully",
        "menupath": "markup/Understanding Scully and project structure",
        "orderpath" : 4
    },
    {
        "path": "blog",
        "menupath": "markup/Static blog demo"
    },
    {
        "path": "s/motivations",
        "menupath": "markup/Static MD demo"
    },
    {
        "path": "s/dynamicmd",
        "menupath": "markup/Understanding dynamic md"
    },

    {
        "path": "d/teaching/secuweb",
        "menupath": "markup/Dynamic MD demo",
        "title": "Demo Hackmd",
        "subTitle": "Demo Hackmd",
        "meta": ["demo", "dynamic", "md"],
        "mdsource": "https://hackmd.diverse-team.fr/D9nr78AzSX2V9i5EOJ6hzA",
        "tocrootselector": "#cours",
        "tocselector": ["h1","h2","h3","h4"],
        "toctitle": "Plan"
    },
    {
        "path": "s/flexibility",
        "menupath": "Flexibility/Configure Static VS Dynamic",
        "orderpath" : 5
    },
    {
        "path": "s/whydsl",
        "menupath": "DSL/Why using DSL",
        "orderpath" : 6
    },
    {
        "path": "s/dslsurvey",
        "menupath": "DSL/DSL1: markup syntax for surveyjs"
    },
    {
        "path": "s/dslconfagenda",
        "menupath": "DSL/DSL2: a DSL for a conference agenda"
    },
    {
        "path": "s/dsldesign",
        "menupath": "DSL/Design your own DSL and embed it in Mulder/Scully"
    }
]